Styleline Fitting Started
Floor and insulation fitted
 Over the weekend I started fitting the Styleline kit to my van. The weather was not great on Saturday but a friend of mine kindly let me use his workshop, this made life much easier.
I emptied the van completely and gave it a good brush out and cleaned up the all the side panels and floor with white spirit. The first stage of fitting the styline panels is to fit the insulated flooring system, this is fairly straightforward as the kit comes with metal support struts for the floor pre cut. It is just a matter of following the instructions and positioning the struts in the correct position then bonding them to the floor using the supplied adhesive. You then need to wait for the adhesive to cure before you can fit the insulation between the struts as otherwise this could lift the struts. There are also 3 floor supports which require rivetting and bonding to the sliding door step.
While the adhesive was curing I worked out where I need to cut the wooden flooring for the feet of my multivan seat to fit through. The multivan rear seat has rollers at the front which run along the floor as it slides out to make a bed, these also support the weight of the bed. It is therefore important that these are at the correct height to run smoothly along the floor, it was apparent that the multivan seat would require spacers to lift it slightly as it was designed to work with a thinner floor than the Styleline insulated floor.
The Styleline floor excluding covering sat 32mm above where the seat feet bolt to the van, the wheels sit 28mm above the same point. So I was going to need 4mm spacers to bring the wheels in line with the floor, not forgetting an extra 2mm for the polyflor heavy duty vinyl I'm going to use. I drew around the seat feet positions on the wooden floor with the seat postioned over its mounting holes in the van, I then removed the floor and cut out the holes with a jigsaw.
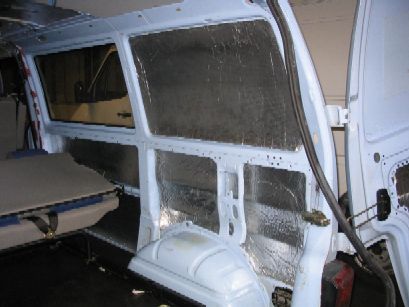
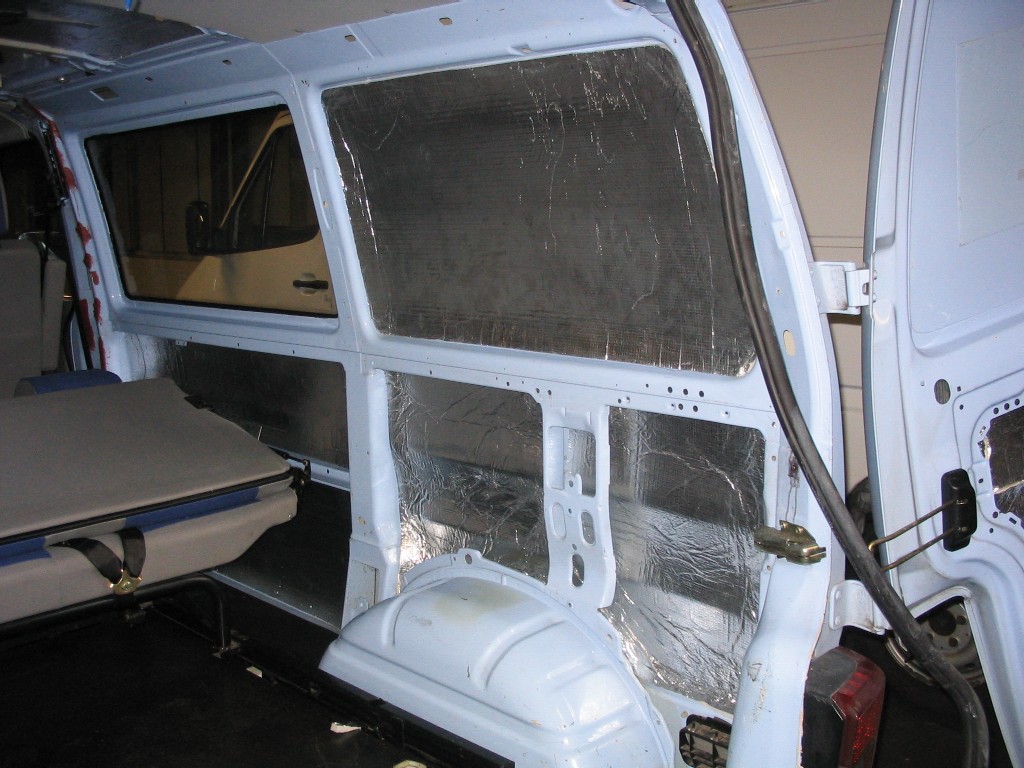
I now insulated all the side panels, roof and rear / side doors of the van using the precut 15mm foam / foil backed insulation supplied by Styleline. The panels were given a rub over with a scotch brite pad and carefully cleaned before bonding them to the van using an aerosol carpet type adhesive. I then cut out the provided 15mm insulation for the floor and fitted this in the van and used remaining offcuts to fill any gaps on the van floor.
Whilst the wooden floor was out of the van I cut out the vinyl by putting the wooden floor over it and using it as a template. The vinyl was tough work to cut and I went through 4 blades and about an hour of time. I then fitted the wooden floor into the van and drilled and screwed it to the support struts and put the vinyl over. I trial fitted the multivan seat with 6mm spacers and the wheels ran over the surface spot on.
By now it was 8pm on Sunday so I called it a day and drove home. The van seemed much quieter and less rattley with all the insulation in place.
 Over the weekend I started fitting the Styleline kit to my van. The weather was not great on Saturday but a friend of mine kindly let me use his workshop, this made life much easier.
I emptied the van completely and gave it a good brush out and cleaned up the all the side panels and floor with white spirit. The first stage of fitting the styline panels is to fit the insulated flooring system, this is fairly straightforward as the kit comes with metal support struts for the floor pre cut. It is just a matter of following the instructions and positioning the struts in the correct position then bonding them to the floor using the supplied adhesive. You then need to wait for the adhesive to cure before you can fit the insulation between the struts as otherwise this could lift the struts. There are also 3 floor supports which require rivetting and bonding to the sliding door step.
While the adhesive was curing I worked out where I need to cut the wooden flooring for the feet of my multivan seat to fit through. The multivan rear seat has rollers at the front which run along the floor as it slides out to make a bed, these also support the weight of the bed. It is therefore important that these are at the correct height to run smoothly along the floor, it was apparent that the multivan seat would require spacers to lift it slightly as it was designed to work with a thinner floor than the Styleline insulated floor.
The Styleline floor excluding covering sat 32mm above where the seat feet bolt to the van, the wheels sit 28mm above the same point. So I was going to need 4mm spacers to bring the wheels in line with the floor, not forgetting an extra 2mm for the polyflor heavy duty vinyl I'm going to use. I drew around the seat feet positions on the wooden floor with the seat postioned over its mounting holes in the van, I then removed the floor and cut out the holes with a jigsaw.
I now insulated all the side panels, roof and rear / side doors of the van using the precut 15mm foam / foil backed insulation supplied by Styleline. The panels were given a rub over with a scotch brite pad and carefully cleaned before bonding them to the van using an aerosol carpet type adhesive. I then cut out the provided 15mm insulation for the floor and fitted this in the van and used remaining offcuts to fill any gaps on the van floor.
Whilst the wooden floor was out of the van I cut out the vinyl by putting the wooden floor over it and using it as a template. The vinyl was tough work to cut and I went through 4 blades and about an hour of time. I then fitted the wooden floor into the van and drilled and screwed it to the support struts and put the vinyl over. I trial fitted the multivan seat with 6mm spacers and the wheels ran over the surface spot on.
By now it was 8pm on Sunday so I called it a day and drove home. The van seemed much quieter and less rattley with all the insulation in place.
posted by Clive at 11:49 AM
![]()
2 Comments:
Just wondering what insulation did you use in side roof and floor, I want to do my van but I worried about the insulation sweating behind the panels
how did you fit the carpet
Post a Comment
<< Home